You can use Sketch to create Masks in several ways depending on your needs. You can create simple Masks and Image masks, or let Sketch help with masking using selections. Sketch supports two specific types of mask modes, Outline and Alpha, and you can create them from all types of Layers (including images).
On this page
There are a few different ways to create masks in the Mac app, but they all follow the same rule: we’ll use the shape that’s lowest in the Layer List as the mask.
How to create a simple Mask
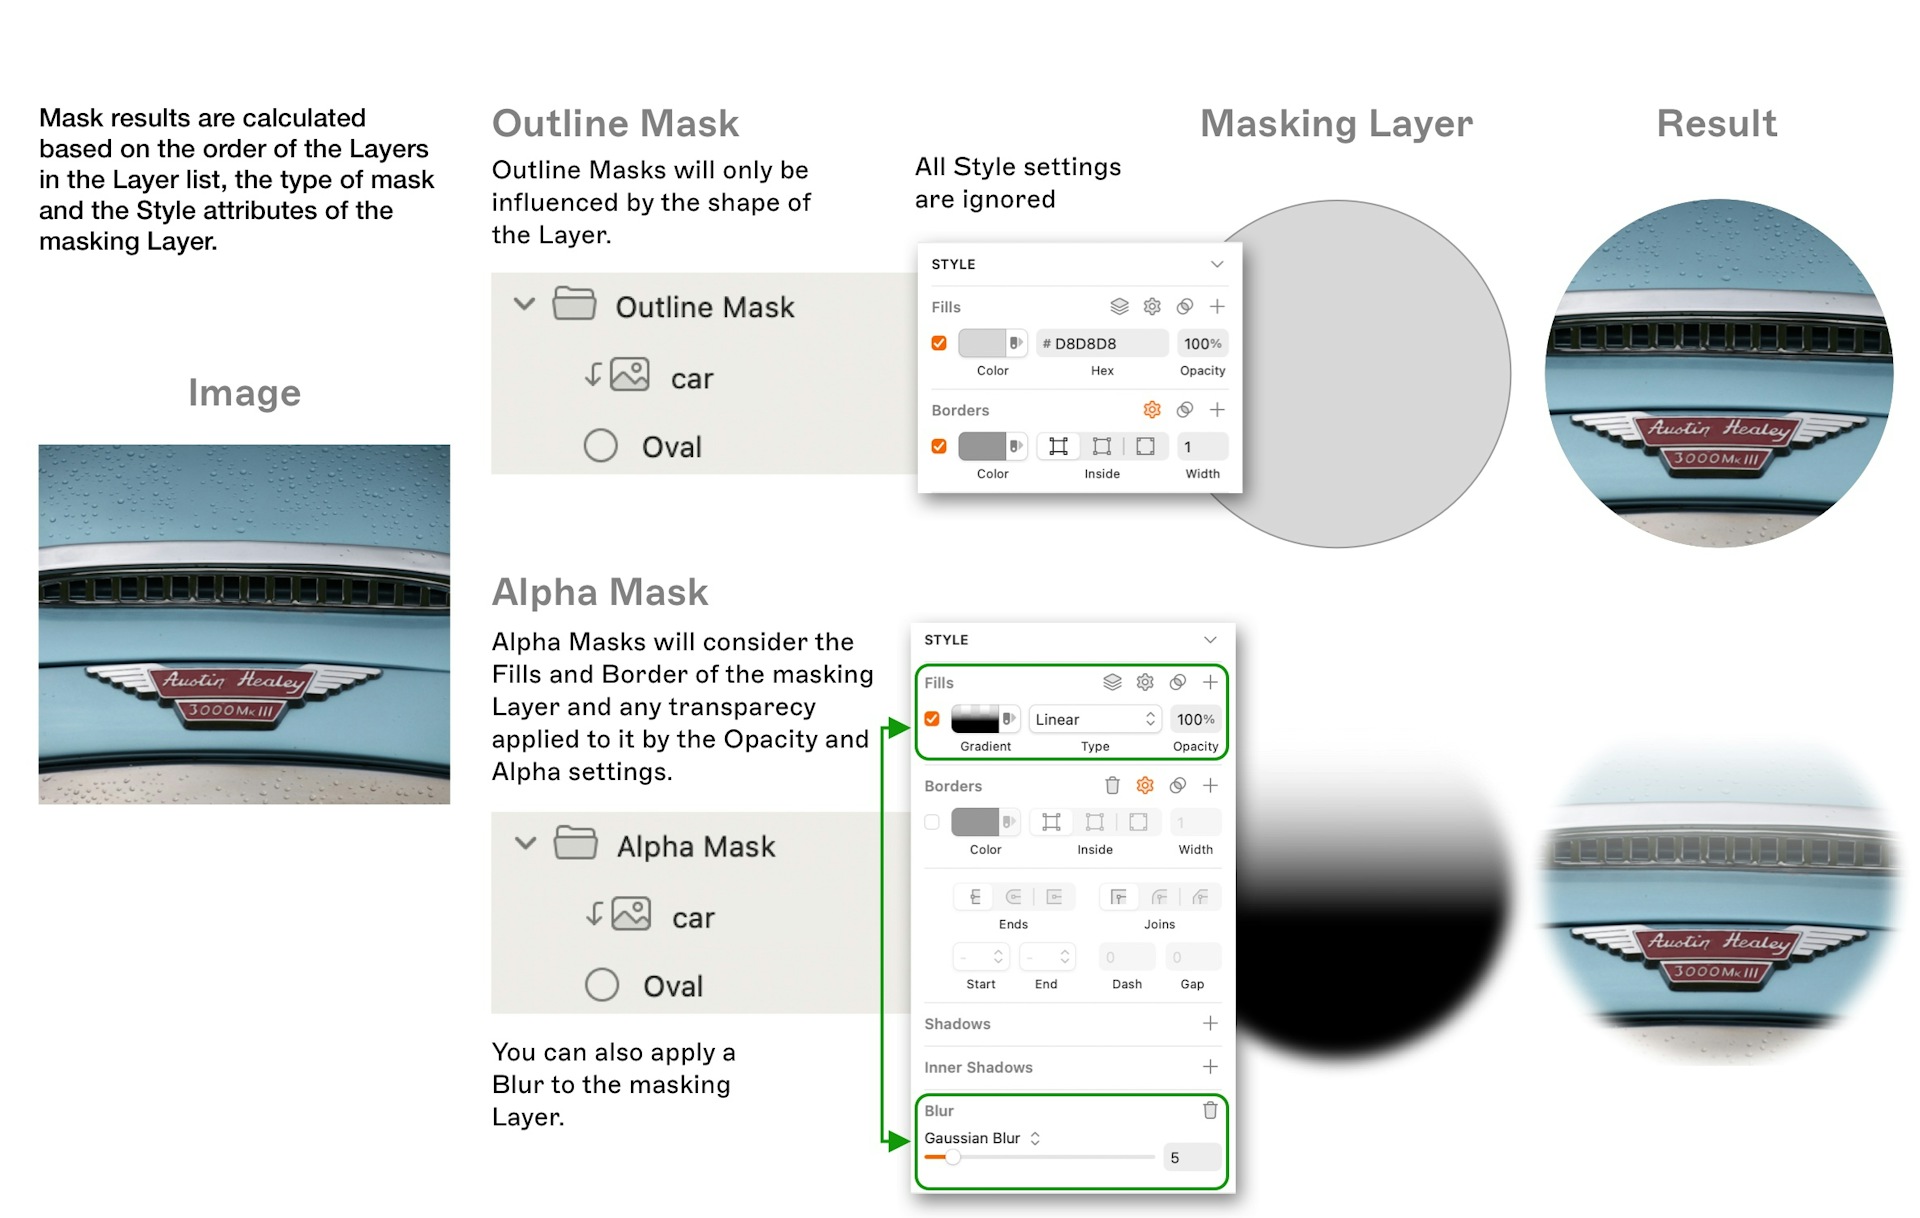
A Mask in Outline mode only shows parts of a layer or multiple layers that fall within its shape. There are a few ways to create them.
Select a shape on your canvas and choose Layer > Mask > Use as Mask. Alternatively, you can control-click on the shape and select Use as Mask or use the ⌃⌘M shortcut.
When you create a mask, we’ll add icons to any layers or groups above it in the Layer List to show that they’re being affected by the mask. The icon for the masking layer itself will appear without a fill in the Layer List. If you drag another layer or group above the mask, it will also be affected by it.

You can remove the Mask from a Layer by selecting the Layer and selecting the Use as Mask option again from either the context menu or the Layer > Mask menu option.
By default Masks will be set to use Outline masking Mode, you can change this to Alpha masking using Layer > Mask > Mask Mode > Alpha Mask.
If you want to place objects above your mask layer but don’t want them to be included in the mask, select it and choose Layer > Mask > Ignore Underlying Mask.
You can also group your masked layers and the mask itself so that anything outside of that group isn’t affected.
Masking with Multiple Selections
If you select multiple layers at the same time, you can mask them all at once by choosing Layer > Mask > Mask Selection. This will use the shape at the bottom of the Layer List within your selection as the mask and automatically group them all.
An exception to this rule is if you want to mask an Image with a specific shape. In this case, you can draw it on top of the Image and then select both the shape and image and use Layer > Mask > Mask Selection. Sketch knows that you want to Mask the image with the shape and creates a Group with the Layer now underneath the Image and masking it.
Note: If the image contains any Alpha (transparency) values, and is the lowest layer, Sketch will assume you want to use the image as the mask.
When you have multiple layers selected, control-clicking on your selection will also give you the Mask Selection option.
Selecting a layer within a mask group and choosing Layer > Mask > Ignore Underlying Mask will keep it within the group, but stop it from being affected by the mask.
Simple Image Masks
Sketch also supports creating a Mask for an Image using just the Image. Select any Image and use the Layer > Mask > Mask Image or the same option from the context menu. This adds a Masking Layer and groups the image with the Mask. This is quick way to crop images for example.
How to create an Alpha Mask
Alpha masks in the Mac app hide anything that falls outside of their shape and also control the opacity of any layer they’re masking.
To create an Alpha mask, create a mask as usual, then select it and choose Layer > Mask > Mask Mode > Alpha Mask.
Head to your mask layer’s Fills in the Inspector and be sure that it has a fill which has an Opacity / Alpha value or a gradient fill which includes an Alpha. This is what Sketch will apply to any masked layers. You can also add a blur for a smoother look.
Comparing Outline and Alpha mask modes
The best way to understand Masks is to experiment with the Mask types and the Style settings of the Mask Layer.

You can use any Layer, including images, as a mask. In the case of PNG images with transparency, when they are used as an Alpha Mask the transparency will be reflected.
You can use Fills and Gradients with Alpha values on Alpha masks and blur the edges of the Mask and even combine multiple fills to create the effects you want.
